Popular Posts

Showing posts with label budget. Show all posts

Spicy Zucchini "Noodles" with Sausage and Mushrooms

0 comments
M and I recently went on our honeymoon, which means we're coming back from a week of eating unlimited delicious food and downing tons of awesome girly drinks in the pool. It also means we're feeling pretty sluggish and a little heavier than we were when we left. So, when we got home, I decided to get back into cooking with tons of fresh vegetables. Since I'm mostly off work for the summer days, I've got lots of cooking time on my hands every other day. Even though it's crazy hot out these days, I was craving something warm and filling, so I decided I'd finally try out using zucchini for noodles.

You'll need:
2 or 3 zucchini
2 cups sliced mushrooms
1 can diced tomatoes (or dice your own if you've got them)
2 mild Yves meatless sausages (optional- these are obviously a lot healthier than pork sausages, but if you're not into meatless, anything like this would do)
1-2 tsp chili flakes (depending on how hot you like things)
1 clove garlic, minced
olive oil
salt/pepper

Optional: feta

Cut the stems off the zucchini, and slice them into noodle shaped/sized strips. You can use a food processor if you have one, but I used a potato peeler to peel off thin strips, then sliced the strips into narrower bits. Eliminate any middle parts that are too wet and seedy.

Put these zucchini "noodles" in a colander in the sink, or over a bowl, and salt them lightly and allow to drain for 30 mins to an hour. This causes the zukes to release extra water and stops them from getting soggy. If you want to go the extra mile, gather the drained noodles and wring them out in paper towel. Set aside.

While these are draining, make the "sauce" for your "noodles".
Start by sauteeing the mushrooms in your oil and garlic until they're nice and brown. Slice the sausages into thin rounds and add them in to the mix. Drain the water from the tomatoes and add them in as well. Season with chili flakes and let simmer for a few minutes.

Heat a little oil in a separate pan, and toss the zucchini in it for no more than a couple of minutes. Combine noodles and sauce in whichever pan is larger. Heat together for about 5 minutes until nicely combined.

Crumble some feta on top, and serve warm.

Enjoy!

A


Guiltless Leek and Potato Soup (in only 4 ingredients!)

0 comments
Leek season is upon us! It's a fleeting time of year - a brief period of time when it makes any kind of budgetary sense to buy leeks. Onions and I have a troubled relationship made complicated by my uncooperative digestive system. Leeks however, have never done me wrong. What's more, leeks, like other onions, are great for lowering cholesterol, which is all well and good as long as you don't slather them in cream and butter, which are the leeks most common pot-fellows. So, with that in mind, here is a super easy recipe for leek and potato soup sans cream (but with butter). I think this would be worth a shot with margarine, or even without butter at all, but I can't say I've tried it. Let me know how it works out if you do!

You'll need:
  • Soup pot
  • hand blender (other blenders are fine, just messier)
  • 3 large leeks, cleaned and sliced
  • 5 cups vegetable stock
  • 2-3 tbsp butter (depending on how much leek you get...they tend to vary a lot in size)
  • two russet potatoes, peeled and diced
  • 1 bay leaf (optional)
 Let's do it!:
  •  To prepare your leeks:
    •  wash all visible dirt off the outsides to keep your cutting board clean
    • Chop off the dark green leaves, leaving light green ones (they're perfectly fine in a soup)
    • Slice off the root and about 1/2-1 inch of the bottom white section, leaving as much as possible.
    • cut in half the long way. It doesn't have to be perfect- remember you're going to puree these anyways
    • Wash out all the dirt you can (I like to give them a good scrub using a vegetable brush) from the outside and inside of the leaves
    • Slice width-wise to get nice, manageable half-rounds of leek. 
  • Melt butter in your soup pot.
  • Add the leeks, and stir to coat.
  • Cook down for anywhere from 5-10 minutes, stirring frequently, until your leeks look translucent. I set my burner to medium heat and it worked well.
  • Add potatoes, stir.
  • Add bay leaf, if you're using one.
  • Cook for about 10 minutes, stirring frequently, until potatoes begin to soften.
  • Add stock.
  • Bring to a boil, then reduce to a simmer for another ten minutes or so.
  • Let cool.
  • Remove bay leaf .
  • Once cooled, blend with the hand blender.
Serve hot, with freshly cracked black pepper if you like.

Yogurt-Dill Salmon

0 comments
Wowzers has it been a long time since we posted anything! We would like to apologize for this long delay. Amanda and I have both been very busy in the last few months and finally got around to cooking again! We both got great new kitchen appliances that we are just dying to try out! :)

As we are supposed to be eating fish twice a week, I try to make a conscious effort to include it in my diet. I usually end up eating a can of sardines (I know, probably not the best...) or salmon to bake. Salmon is probably my favourite fish and it's great for my cholesterol!

In light of this, I decided to thaw my salmon in the fridge yesterday while I was at work. I knew I only had about a half hour to prepare supper since I had an evening appointment and salmon recipes are usually quite quick to make.

Thanks to the wonderful Martha Stewart, I was able to adapt her simple, delicious and quick roasted salmon recipe with ingredients in my pantry.

Ingredients:
  • 1/2 cup 2% natural yogurt
  • 2 tbsp dijon mustard
  • 1/2 teaspoon dry parsley
  • 1 teaspoon dry dill
  • Salmon filet
Prepare:
  1. Pre-heat your oven to 450 degrees F
  2. Mix the yogurt, mustard, parsley and dill in a bowl
  3. Place your salmon filet, skin down, on a lined cookie sheet
  4. Spread your yogurt mixture on top of your salmon
  5. Bake for approximately 20 minutes, or until the salmon is cooked (it will be flaky)
That's it! I served it with boiled potatoes which take approximately the same time. Perfect and healthy dinner! :)

Enjoy!

-CK

Dill Broccoli Salad

0 comments
C and I have just come back from a helluva long weekend at an amazing cottage on Leslie Lake. While we were there we revisited some favorite recipes from last year's cottage adventures, and mixed up some new ones. Because it was gonna be hot as heck, I focused on salads this year, making one coleslaw, and one pasta salad. M and I had prepared pretty awesomely for the cottage, but came back to empty pantries at home, so tonight I mixed together some leftover ingredients from the first two, and came up with something pretty tasty for a hot summer's night.

You're gonna need:
1 bag (roughly 5 cups) of broccoli, julienned (I had a bag of PC broccoli slaw in the fridge)
Half an onion, chopped
1/4 of a cucumber, sliced in cookies and quartered
1/4 fresh dill, chopped
PC Artichoke and asiago salad dressing (or anything creamy and cool)
a small handful of feta cheese, crumbled
tons of freshly cracked black pepper

Mix it all together and eat your heart out! Delicious with cheese pizza.

Kafta Burger Patties

0 comments
BBQ season is upon us! For what has now become a traditional annual cottage week end, this Canada day week end will be spent eating and bathing at a friend's cottage. Unfortunately, cottage-time often means quick and easy meals, which often equals store-bought hot dogs and burgers, and whatever other fast food you can find.

Since both A and I are trying to watch what we eat, I inspired myself from last year's sweet and sour chicken skewers and amazing pasta salad, and decided to prepare everything ahead. That way, we'll make sure that we eat right and light. As I'm sure a whole bunch of other posts will follow post-cottage, I'll give you a pre-taste of the meals we'll be enjoying at the cottage. Let's start with burgers!

Image Source
This burger patty is a traditional Lebanese recipe (a.k.a Kafta) and is absolutely fantastic! These patties cost me around 7$ to make, if not less (for 10 regular size patties).

You'll need:

  • 1 lb lean ground beef
  • half an onion, diced
  • half a bunch of parsley, cut up into the tiniest pieces possible
  • 2 stalks green onion, chopped
  • salt and pepper to taste
The steps are very simple: 
  1. Mix all your ingredients in a bowl, making sure your veggies mesh well with the meat (think of it as kneading the meat)
  2. Once everything is mixed well, form 10 balls, approximately the size of golf balls (maybe slightly bigger)
  3. Take each ball and flatten it on the palm of your hand. Note: If the meat is sticking to your hand, don't hesitate to dab a little bit of cold water into the palm of your hand.

That's it. That's all. If you're not planning on eating them right away, freeze them!

If your boyfriend is anything like mine and likes the raw taste of meat, avoid buying the pre-made-fully-packed-with-fake-food burger patties, and simply add salt and pepper to a pound of lean ground beef and form patties. 

Enjoy BBQ season and stay tuned for our other cottage recipes! 

- CK

Sparkling Summer Salad: Or, How I learned to stop slicing and love the mandolin,

0 comments
I get a terrible feeling when I come to the end of a recipe I have all the ingredients for (ish) only to read the final instruction: crockpot-ing, immersion blending, dutch oven-ing...or any number of other final touches for which I don't have the right kitchen tool (yet!). So, having recently acquired a very handy mandolin from the previous owners of my new house (when someone leaves something in a cupboard still in the box, that's a housewarming gift right?), I've spent the better part of the afternoon julienning everything slice-able in my fridge (which is more than you'd think! Skinny cheese sticks anyone? Strawberry stick-men? Long long banana slices? No?).

The very tasty outcome of this little experiment is a pretty awesome summer salad: it's crunchy, tart, filling, and refreshing, and above all, easy (especially if you have a mandolin or any other kind of slicing tool).

You're gonna want:
A large bowl
A little bowl
A mandolin (you lucky duck)

In your big bowl toss together:

3 stalks of celery, sliced thick
half a cucumber, julienned
2 large carrots, peeled and julienned
2 granny smith (or other tart) apples, julienned [to do this, cut the apple into 4 sides, then attempt to slice - I kept the peels on)
l large handful of fresh cilantro, roughly chopped

In your small bowl mix:
1/2 cup lemon juice
1-2 tbsp olive oil
1 tsp apple cider vinegar (optional)
1 tbsp sugar (also optional - i wanted my dressing a little sweeter than lemony)
large grain salt to taste (I used a citrus chili salt mix and it was perfect)
cracked black pepper to taste

Drizzle the dressing over your salad mix and stir around until well distributed. Cover and keep in the fridge for an hour to let the flavours combine if you have the time, or serve fresh immediately!


Pairing A Sauvignon Blanc For Your Next Party

0 comments
This past Thursday night we revisited our earlier experimentation with wine pairing. On the menu? My favorite 10$ or less brand of choice, Barefoot, in a bright green Sauvignon Blanc. These days it really feels like summer is upon us, and bright, crisp wines like a Sauvignon Blanc are just right for cutting through the heat. This one is very fruity, but not too sweet. It smells quite strong (too strong, I'd say) but doesn't deliver any kind of offensive flavors - rather, it's a little melon, a little pear, a little zest, and a little sparkle. Online wine reviews like to pooh-pooh some of these "beginner wines", but there is certainly also a market for people learning to drink and enjoy wines with their food, and Barefoot seems to specialize in these immediately drinkable wines. We matched this wine with guacamole and tortilla scoops. It certainly was an excellent pairing, and might improve this wine for those who aren't usually drinkers of white. Though this Sauvignon wouldn't be my first choice for a wine to drink on its own, it makes an excellent choice for pairing with the right foods (I can't recommend the guac pairing enough; it was really delicious, and party-ready) when you're kicking off a fun spring or summer evening.


9.94$ at your local LCBO!


A

Easy Escargot Appetizer

0 comments
Last week, A and I had our monthly date night. With a lot of different occasions coming up, we decided to have a romantic dinner at home, where we cooked together and enjoyed a nice bottle of wine. To start up the dinner, we put together a very easy escargot appetizer that will truly make you feel like you can open your own restaurant. Here we go:

Ingredients (for two large portions - this could easily have been 4 portions):

  • 2 tbsp garlic butter (the green package at the market, or you could make your own)
  • 2 cans of escargot
  • shredded mozarella cheese (you can ultimately use whatever cheese you want)
Do:
  1. In a non-stick frying pan, melt the butter on medium-low heat 
  2. Add the escargot and mix well until they are coated with the butter. Keep stirring for about 3-4 minutes.
  3. Set in plates and sprinkle some shredded cheese. Add as much cheese as you'd like. 
That's it! It was absolutely fantastic! 
You could even up it up a notch and cover them with cheese and broil them in the oven for a few minutes. You can serve these with some scoop tortilla chips (yes, yes, trust me on this one) at a potluck, your guests will love you forever! 

100 calorie Sweet Potato and Zuke Latkes

0 comments
3 100-cal latkes with astro biobest plain yogurt!

I love love love latkes and regularly order them when I'm out for brunch, but I know they're not the healthiest way to eat a potato. Some experimenting with different grate-ables led me to this combo, which significantly improves the nutrition factor, and minimizes the caloric intake. Plus, this is a great way to use zucchini (I'm always wondering what the heck to do when I'm not making it into a risotto or my mom's curry-zucchini soup (coming soon!).

You'll need:

1 medium zucchini (funny ends sliced off)
1 big sweet potato (peeled)
1/4 cup onion (chopped as finely as possible, unless you really love onion and want longer strings in your latkes)
1 large egg, lightly beaten
3 tbsp canola oil
salt and pepper to taste

optional: plain yogurt (instead of sour cream) or your favorite applesauce (if you're that kind of latke person...I've never understood the applesauce thing)

Do: (do these things in order - you want to prepare the batter RIGHT before cooking to keep things from getting soggy, and while cooking, pour off any excess liquid for the same reason)

Slice your zuke lengthwise and remove its seeds.
Grate your potato and zucchini (coarsely) either in a food processor (preferred) or by hand on a grater.
In a big bowl, mix your egg, onion, salt and pepper: stir in your grated veggies.
Heat half the oil in a large skillet (med-hi, but more med than high).
You're going to do this the same way you do pancakes: add a heaping tablespoon of the mixed ingredients to the skillet, flattening down a touch with your spoon (don't overdo this - let the latke be once it's frying).
When the edges start to lightly brown, flip the lakte, and cook the other side for about a minute or two - depending on your oven, the first side can take from 2-4 minutes (mine is slow).
Remove and rest on paper towels to absorb excess liquid.
Repeat until your batter is used up (if you need, use the remaining 1.5 tbsp of oil to refresh your skillet).

Should make about 24 latkes. If you want to reheat them later, bake them at 375 on a cookie sheet for about 5 minutes.

Serve hot and enjoy guilt-free.


DIY Cheese Tortellini

0 comments
How would you feel if I told you you could make your own cheese tortellini with 4 simple ingredients? With lent season starting today, and my choice on cutting on meat, I have no choice but to start looking for great vegetarian recipes again. This cheese tortellini is definitely going up on my list! The original recipe was for a lobster tortellini, which - you know - I'll HAVE to try out. But in the meantime, let's start small shall we? ;)

Now, I must warn you that this does take a while (i.e. approximately 2 hours) if you don't have a pasta maker (that's definitely on my next wish list!!). In the meantime, get ready to use those muscles, because you're in for a delicious ride! :)

Note: This is a great recipe if you're just starting with pasta making. It definitely put me in the mood to start making all my pasta from scratch!

Step 1. Make the pasta dough

All you need for this pasta dough recipe is flour and water. Yes. That's it. Trust me on this one. So, for about 5 good portions of tortellini, use:
  •  3 cups of all-purpose flour and 1 cup of whole wheat flour (feel free to play around with those, I would suggest keeping the ratio at max a half and half, but that's for you to experiment). To this, add 1/2 a cup of warm water and mix.
  • Add warm water to this mix - one tbsp at a time - until all the dry flour has been absorbed. Knead this ball of dough for about 10 minutes (it should be stiff for you to knead), or until you get a nice smooth ball that's not too sticky, but not too dry either. You'll see what I mean as you do it. Don't be shy and give it a try :)
  • Once that's done, wrap it in plastic and let it rest for at least 1 hour. That'll give time for the glutens to rest so you get a nice elastic dough.
Step 2. Make your cheese filling
  • For the amount of dough you made, you'll need about half a box of ricotta cheese (I picked the traditional kind because I wanted to be on the safe side - I'm not a ricotta expert) and about a tablespoon of fresh cut parsley. C and I are not big fans of parsley's strong taste, but still wanted to add a little something to the cheese. Feel free to add more if you like :)
  • Mix well in a bowl and let it rest in the fridge until your dough is ready.
Step 3. Make the tortellini - yay!

Oook. Now comes the fun part! First tip I'll give you: work with small portions of your dough - it'll be long, but it'll be much less work on your arms. Make sure you leave the rest of your dough wrapped in plastic so it doesn't dry out while you're working your dough.

Honestly, This is a faster - and funner - process if there's two of you: 1 person rolls the dough and 1 person rolls the tortellini, but that's up to you and how much time you have. 

A. Take a piece of your dough and roll it out on a flouered surface. Make sure it's as thin as possible so your pasta doesn't turn out too thick once cooked, making you miss out on the amazing filling.

B. Using a circular cookie cutter (not too big, not too small, depending on the size you want to make your tortellini), cut circles in your rolled out dough. Apologies for not having a picture for this step, but I think you get the gist of it. Make sure to use the scraps with new dough so that it doesn't crumble the next time you use it!

C. Lay out your cut circles and a little over a quarter of a teaspoon of your cheese-parsley mix to the center.

D. Dab the borders of your circle with water and fold in half. Make sure you press close to the cheese to remove the air in there.

E. Press the cheese up toward the border using your thumb.

F. Twist the two corners towards each other and secure. Place your finished product on a cookie sheet. Play around with the twist and see what they look like! Twisting in different directions will make them look different, but they all have the same delicious taste! :)

From this point on, you have two options:
  1. Freeze them for later. If you're going to do that, make sure they're not touching each other on your cookie sheet and freeze them flat for about half an hour, then transfer them into a freezer bag and save for later. Once you're ready to eat, take them out of the freezer and boil for approximately 3-5 minutes, or until they float to the top - about a dozen at a time, depending on the size of your pot.
  2. Make them fresh! How can you resist?? In this case, boil for approximately 2-3 minutes, or until they float to the top - about a dozen at a time, depending on the size of your pot.
We couldn't resist and had to try it out for supper! So we cooked them and made a simple rosé sauce! :) Quite impressed with ourselves I must say. Now, I have to spend a full day making those for the days we just won't feel like cooking!

Not only are they delicous, but they're also cheap to make! Enjoy it to the last bit and have fun with different fillings. Next stop, LOBSTER! :)

- CK

Light and Tangy Pasta Salad

0 comments
There are some things in my fridge that I never finish before they go bad: low fat plain yogurt, whole carrots, cucumbers, and parsley. It's really sad to see these things wilt or mold or do whatever yogurt does (ick) when they were perfectly delicious a few days ago. With that in mind (and with not wanting to venture outside into the -40 with-the-wind-chill out of doors, I set to a little pasta salad experiment. To be fair, this was also motivated by being a bit grossed out by how much mayonnaise we use to make things creamy (feeling a little guilty about my own mayonnaise habit I guess), so I wanted to do it without.


The results were pretty tasty actually, and this dressing would probably be good on roast potatoes or coleslaw.


In a bowl mix together:


½ cup plain yogurt (I used 1% astro brand that went a little watery on me - perfect for this!)
1.5 tbsp whole grain mustard
1.5 tbsp olive oil
3 tbsp minced fresh parsley
1 tbsp lemon juice
1 tbsp white vinegar
1 clove minced garlic
1 tsp red pepper flakes
A high protein variation for my workweek! One can
of rinsed black beans, one can of tuna in water, 3 carrots,
6 cups of cooked penne, 3 stalks of celery, 1/2 cup chopped
parsley, and 1/2 cup dressing! Delicious :)

Add about 1.5 tbsp of this dressing to roughly:
3/4 cup cooked cold penne pasta (ideally whole wheat)
1 large carrot, sliced
1/4 cucumber, quartered
optional: 2 tbsp parley, minced (I had some left over from making the dressing, and love parsley...plus it offsets the raw garlic in the dressing, breath-wise)

Season your salad with salt and pepper to taste.

You could easily add any kind of bell pepper, celery, onion, black beans (I suspect this would be delicious), and/or black olives or anything else that's left in your fridge and needs eating. Any other suggestions are very welcome!

xox
-A

V-day Special: Lobster on a Budget

0 comments
Ahhh. Valentine's day. The day of looooove.

A and I have celebrated Valentine's day in different ways, great restaurants and horseback riding being on the menu. But this year, we both have plans that require saving our money and so this much celebrated event will have to be experienced without having to dish out on expensive bottles of wine and restaurants so fancy that only a connoisseur would know where to find ( A is fancy like that ;) ).


This meal was prepared for a birthday celebration,
but is PERFECT for a romantic dinner :)
I'm sure many of you are in the same situation - want to do something nice and romantic, but don't have the mullah for it. That's why we bring you the Lobster on a Budget meal. This meal will require around 1.5 hours to prepare and will only cost you about a third of what you'd pay in a restaurant (depending on the lobster you get of course). It cost me around 30$ for 2 meals - including the wine.

With this, you can easily get the restaurant experience in the privacy of your home, and without having to take out the only savings you have left to please your mate. Actually, preparing this meal for them (or together) might be more rewarding for the both of you! ;)

This is a perfect pairing with the easy Beets Appetizer! Idea: Prepare a 3 course meal with these great recipes! :)

So, this meal requires 3 steps: the potatoes, the green beans and the lobster.

Note: If you're not the cooking kind, check out our great Valentine's day restaurants post and take your mate out for a nice night on the town!

Before we start, find a warm area where you can keep your finished dishes, or make some room on your counter to let them sit while covered to make sure they stay relatively warm when you serve them.

Step 1: Prepare Rosemary Roasted Potatoes

The Food Network's website has a lot of great recipes to try out and adapt to your liking, this one was definitely one of them.

Ingredients:
  • 3 large Russett potatoes, peeled and cut into wedges.  
  • 1/8 cup extra-virgin olive oil
  • 3/4 teaspoon salt
  • 1/2 teaspoon freshly ground black pepper
  • 1 tablespoon minced garlic (3 cloves)
  • 2 tablespoons dry rosemary
Method:
  1. Preheat the oven to 400 degrees F.
  2. Place the potatoes in a bowl with the olive oil, salt, pepper, garlic and rosemary.
  3. Toss until the potatoes are well coated.
  4. Dump the potatoes on a baking sheet and spread out into 1 layer.
  5. Roast in the oven for at least 1 hour, or until browned and crisp. Flip twice with a spatula during cooking to ensure even browning.
  6. Remove the potatoes from the oven, season to taste, and serve.
Voilà! Easy peasy! Now, while the potatoes are roasting, prepare your green beans.

Step 2: Prepare the Lemon-Butter Green Beans

Gotta love the Food Network!

Ingredients:
  • 1/3 pound fresh green beans, ends trimmed, blanched in boiling salted water
  • 1 tablespoon butter
  • 1 tablespoon pine nuts (optional, A doesn't like pine nuts)
  • 1 teaspoon fresh lemon juice
  • Pinch salt
  • Pinch freshly ground black pepper
Method:
  1. Drain green beans well and pat dry.
  2. Heat the butter in a medium skillet over medium heat.
  3. Add the green beans and toss to coat evenly. Cook just enough to warm through, about 1 minute.
  4. Add the lemon juice, salt, and pepper and toss to combine.
  5. Remove from the heat and put those aside
  6. Start prepping your lobster! :)
Step 3: Grill your Lobster

At this point, you have 3 options:
  1. If you own a bbq and it's been sitting through the winter, now's a good time to wake it up a little before the summer.
  2. If you have a grilling pan, that's great because you can just cook it on your stovetop!
  3. I purchased the lobster already cooked, so you may not even have to do anything with the lobster if you can't grill it (although you can always try a nice broiled lobster, but I wanted to try my new pan :))

Now that you've picked your option, on to the cooking. This marinade is fairly simple and gave a great taste to the lobster tail (which is really the only part you can do something with if you're grilling).

Ingredients:
  • 1 tablespoon lemon juice
  • 1/2 cup olive oil
  • 1 teaspoon salt
  • 1/8 teaspoon white pepper
  • 2 cloves of garlic, minced
  • 2 frozen lobsters (size of your choice. I found small-medium lobsters for 6$ each at my local Metro - jumped on those ones) - you can also use lobster tails if you feel it might be easier for you.
Method:
  1. Preheat the grill for high heat.
  2. Squeeze the lemon juice into a small bowl, and slowly whisk in the olive oil. Whisk in the salt, white pepper, and garlic.
  3. Rinse you lobster and flip it on it's back. Cut open the "casing" of the tail. Remove the top transparent shell so that the flesh is showing but is still sitting in the bottom shell.
  4. Baste the flesh part of the tail with the marinade.
  5. Lightly oil the grill grate and place the tails, flesh side down, on the preheated grill. (if you're using the grilling pan, it's normal that your lobster doesn't fit in your pan, its upper body might be dangling out a little). 
  6. Cook for 5 minutes, pressing the tail against the grill and basting frequently with the marinade. Discard any remaining marinade.
  7. Do the same with the second lobster.
Serve this deliciousness with some melted garlic butter (We used a chocolate fondue set to keep the butter melted and warm) and some homemade bread with some garlic butter spread.

Wine Pairing: Since this meal is full of butter, pair it with a nice Chardonnay. I know, the picture has red wine, but that's because A doesn't drink white. If you want to go with red, go with a Pinot Noir.


Bonus Step: Setting the Atmosphere

Yay! You've created an epic meal (granted, full of calories and cholesterol, but hey, it's Valentine's day)! Setting the table is key to creating the atmosphere:
  1. Find a white tablecloth and drape it over your table.
  2. Create a centerpiece with candles and empty bottles of wine.
  3. Plate the food so that it looks somewhat appealing (you be the judge). A good tip is to play with levels.
  4. If you don't have the lobster tools, use some nut crackers - we got some for $3 a piece.
  5. Have some jazz music playing in the background.
  6. Crack open that bottle of wine and enjoy your evening!

Roasted HeartBeets Valentines' Day Appetizer

0 comments
Special occasion dinners are divine, but they can also put a lot of pressure on people who are used to eating out of tupperware to make a multi-course meal on real dinnerware (i.e. me). I'm always on the lookout for fun appetizers that make me look like a better cook than I am, and this year I've happened upon a winning combination. The combination of foods isn't a terribly original one (beets and chevre have a long standing and delicious history), but this is a cute visual twist on a safe taste combination that will dress up a dinner in a heartbeat ;) Though this dish is commonly served as a salad, I think it makes an elegant appetizer. It would pair nicely with the lobster dinner we're recommending, and would also be dressed up prettily by a glass of champagne! A nice bonus: beets are great for, you guessed it, your heart.


You'll want to prep your parts about 1.5 hours before serving: the beets need to cool once roasted, and you want to assemble no more than 30 minutes before you serve, so things don't try out or unravel too dramatically). I actually roasted and cooled my beets a whole day before prepping my dish - slicing mint and spreading chevre takes only a minute, and you only need to spend as long arranging your plates as you actually want to - assembly takes about 5 minutes let's say)


Appetizer for 2


Ingredients:


  • 2-3 medium sized beets, peeled
  • 1 tbsp olive oil
  • Sea Salt
  • 2 sprigs of fresh mint (depending on your servings and your mint...basically you want about 2.5-3 mint leaves per plate)
  • a small pat of chevre (I know that's an incredibly vague measurement designation, so check out the final picture..basically you want to put down a little pillow of chevre to "plant" your heart-shaped beets in, so it's pretty much up to you.)


"Heart-beets" before roasting


Don't:
-Wear white. These hearts bleed.


Do:


-Preheat your oven to 375 (make sure your rack is on the middle rung)


-Notice that your peeled beets are already somewhat heart shaped. Slice the beets top to bottom (preserving this natural shape in the slices) in pieces about 1/4 inch thick.


-Using the preexistent shape, make small cuts to shape your beet slices into hearts


-In a bowl, toss the beets in the olive oil until coated


-Sprinkle the coated beets with a few dashes of sea salt


-Lay them out on a Pyrex (glass type?) baking dish or pan. Try to make enough room so that each beet has a surface on the bottom of the pan


-Roast for 35-40 minutes, checking every 10 minutes or so. Skinnier slices will roast faster, so feel free to take them out early (my littler hearts took more like 15 minutes), thicker ones could take as long as 40 minutes. Stir the beets every 10 minutes. When they're done they'll look glazed, but not crispy.


-When they're done, chill the beets covered in the fridge, for an hour.


Before serving:


-Using a knife, lay down a pat or "pillow" of chevre on a little plate; try to mold the pat into an angle, so the hearts will be supported "up" by the chevre, as in the first picture in this post.


-Using your knife, dig little wedges into the cheese, to place the heart in. The beets will dye the chevre pink where they touch it, so you can get creative with that if you want.


Stirred and delicious final product
-Slice your mint into strips, removing the stems. If you want to make little rosebuds of mint, roll a leaf (or stack of leaves) into a tube and slice across the tube. Pinch the little rolls (little minty cinnamon bun shapes) and plant them in the chevre around the hearts, or strew them like confetti if you prefer. It'll be pretty anyways :)


-Love all serve all!


Kick Up Your Coleslaw

0 comments
Tangy and tasty!
There's this little place in my neighborhood called Zazaza, and they make the tastiest, most creative pizzas I've ever had the pleasure of getting my paws on. While this isn't a story about them, you should totally check them out for eat-in or take-out. They're also great supporters of the Do It For Daron initiative involved in raising awareness about, and transforming the experience of youth mental health issue, born out of the tragic death of 14-year old Daron Richardson in November 2010.

So, Zazaza is a great community restaurant, full of great people, supporting an even better cause that warrants all the attention it can get in this difficult times for teens.

In addition to these excellent things, Zazaza serves a ridiculously delicious coleslaw with their pizzas. I don't even LIKE coleslaw, and I LOVE this coleslaw. I think it has to do with their dressing, which is the part I usually don't like about the average 'slaw (since from this blog, I'm sure you can deduce that I am seriously into vegetables).

My take on their dressing is as such..in a bowl mix together:

1/4 cup mayonnaise (or miracle whip or sandwich dressing or whatever you're into these days)
1/2 TBSP Apple cider vinegar (any other vinegar would also work, but would alter the flavor slightly, so experiment!)
1 TBSP whole grain mustard (my mustard option of choice, though I'm sure others are tasty...a spicy mustard would probably be divine!)
1/2 TBSP Brown sugar
1 TSP red pepper flakes (more if you're REALLy into kicky cole')
A couple of good cracks of black pepper

Spoonful by spoonful I used this to dress: [you're basically looking at being able to dress 6.5-7 cups of veggies  all told, so divide up as you like)
2 large celery stalks sliced thinly
2 large carrots sliced thinly
roughly 11oz of carrots (julienned), broccoli stalks (julienned) and red cabbage (sliced thinly)

I love broccoli coleslaw, so usually go heavy on it..of course proportions here are up to you, but this is the quantity of slaw content that the dressing is proportional to.

Tasty additions would be:
-dried cranberries
-flax seeds
-toasted almond slivers or slices


Cold Quinoa Salad

1 comments
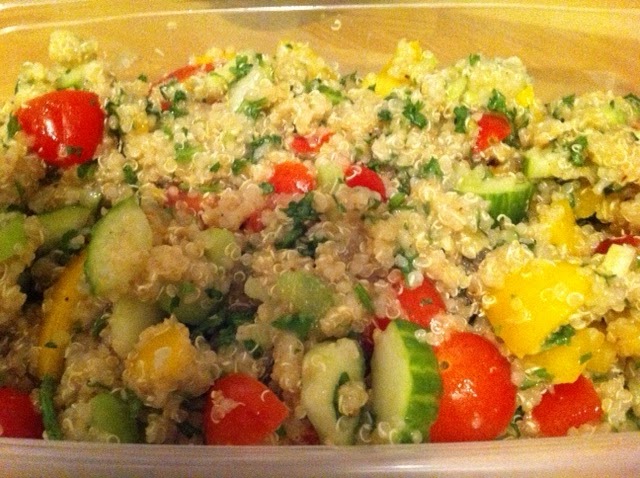
The finished product~
After all that holiday cheer (turkey pies, bacon based salads, and wines of all kinds), it might be time to get back to basics...like vegetables, and primary colors. This cold quinoa salad has both of those things, and is really easy to make. Though he might just be trying to placate me, M said he liked this one too. I adapted this recipe from a recipe on a box of Casbah quinoa...it didn't look like it would have enough crunch or flavor as it was originally intended, so I adjusted some quantities and ingredients to make up for that:

Fluff your quinoa to give it texture and to
make it grainy


First, cook up your quinoa (225g, or 1.5 cups):
To do this, bring 3 cups of vegetable broth to a boil.
Then add your quinoa to the broth; stir, and reduce the heat to low. Allow this to cook for between 15-20 minutes: you want the water to be completely absorbed by the quinoa.
When cooked, fluff the quinoa with a fork.
Let the quinoa cool while you prepare the rest of the salad ingredients.


In a large bowl combine:

Half a cucumber (I prefer skin intact) - thickly sliced and quartered
3-4 stalks of celery  - sliced
1 quart grape tomatoes - halved
1 yellow pepper - roughly chopped
(half a red onion would probably delicious chopped into this, though I didn't do so myself)
1/4 cup chopped fresh parsley (you could up this even, especially if you love parsley, and go to 1/2 cup)


In a small bowl, whisk together:
Apple Cider Dressing
1/4 cup virgin olive oil
4 tbsp Apple Cider Vinegar
1.5 clove garlic, minced
2 tsp red pepper flakes
3 or 4 good cracks of black pepper


Once the quinoa has cooled, combine it with the vegetables. Drizzle the dressing over the mixture and let sit in the fridge for a few hours to let the flavours settle.

A nice touch would be to add 2 handfuls of fresh baby spinach to the mix before serving.


Exciting Post-Holiday Broccoli Salad Update!!

0 comments
So a few months back I posted a slapdash version (not that there's anything wrong with slapdash...amirite?) of my very own personal momma's broccoli salad - one that's been a holiday favorite chez our house since she made it for the first time a few years ago. So, this Christmas she asked me to make it to save her some chopping time, and sent me the recipe (no slapdashery at Reddick family Christmas). Much to my dismay I realized how very different her salad actually was from the one I'd put together here. BUT this can be good! Cause that one's yummy...and so is this one!


This salad takes a little chopping time, but the ingredients keep nicely once chopped. After this Christmas no less than SEVERAL boys asked me for this recipe. BOYS asked for SALAD. So, you know it's good :)

This is the body of the salad, but the original also calls for bacon. Probably a shit ton of bacon.

1 large head broccoli (or, two small heads) (cut into small pieces)
2 cups red grapes (cut in half)
1 cup celery (large dice)
1/2 cup onion (minced as thin as you can)
2/3 cup slivered almonds (lightly toasted)


I doubled that for our family dinner of 13 guests. Notably, this salad keeps fairly well, and makes a great lunch, (probably even greater with aforementioned bacon) so it's nice to make up a double batch and keep it in the fridge.

Try not to think about the dressing too much: it's a combination of mayonnaise, sugar, and vinegar. The amounts are sort of up to personal taste, though it's mostly mayonnaise.


To dress the doubled ingredients, you're looking at roughly:

1 cup of mayonnaise
1/3 cup of sugar (though I always use a little less of this than even I call for here)
2 tablespoons of vinegar


Add it to your mix of veggies in spoonfuls only until it's as coated as you like it - I find that these amounts are the easiest to get the right tangy to sweet proportion of, but make a bit too much dressing to actually use. Another suggestion then, is to just keep these proportions in mind, and sort of wing it with the dressing, tasting as you go. It always turns out delicious, so don't sweat it :) I'll post a picture of mine the next time I make it (M ate all the leftovers, which is a very very good sign).


Add in the toasted almonds last.

 Happy (late) new year from Stute Kitchen! Stay tasty ;)


Unquenchable: A Tipsy Quest for the World's Best Bargain Wines by Natalie MacLean

0 comments


Unquenchable by Natalie MacLean
Doubleday Canada, 2011
$29.95 CAN (also available as an ebook)
356pp

Though CK and I throw back our share of the red wines in this world (and have a damned good time doing it too! Not to mention the actual “wine-throwing” incident...), we’ve both always not-so-secretly wished that we knew more about the wines we were buying and drinking. We both love to learn, and wanted to understand what makes a wine tick, and how to get the most out of any delicious experience (and maybe more importantly, how to turn wines that make us screw up our faces into wines we love by pairing them more appropriately), but we also both really appreciate the bigger picture that contextualizes our purchases, particularly those that go in our mouths. We needed help, particularly as the wonderfully wine-soaked holiday season approached.


AGerman Riesling and Argentinean Malbec:
two delicious wines recommended in Unquenchable
Enter Natalie MacLean’s latest read, Unquenchable: this journey through 8 wine regions, with blessedly specific emphasis on local treasures, serves up a delightful blend of personal travel narrative, wine tasting, pairing, and (best of all) drinking tips for the aspiring oenophile. The book is made mighty by a really satisfying socio-cultural and historical exploration of the worlds and conditions (not to mention a good dose of accessible and fascinating scientific explanation) that bring some of MacLean’s favorite wines to life. Readers who care more about where their wine is really from, and who put their heart, souls, (and sometimes fingers or feet) into it, more than what’s on the label description, will be truly grateful for this human side of wine. Moreover, this isn’t one of those books that will make you feel shabby about your 10$ safety-net Shiraz; instead, Unquenchable is all about introducing the reader to remarkably budget-friendly vintages from around the world. MacLean pulls even the most impressive wines down off their lofty pedestals, turning them into stories and experiences best shared with friends and family, in sloshing raised glasses, to hearty toasts, and belly cheer. Her travels and discoveries are punctuated by memorable information, and followed up by helpful short lists of the chapters’ best value products and producers, sure-fire food pairings, and other handy tools to take to the liquor store.


Argentinean malbec from Mendoza paired
with cheddar cheese and dark chocolate
Other novice wine readers like ourselves might feel a tad disoriented by what is probably very basic wine language, and might regret the lack of a glossary, however one of the perks of Unquenchable is that it prefers storytelling over taxonomy, and so even the newcomer to the ins and outs of wine will feel at home. That being said, having a dictionary (okay, the internet) on hand, will give readers quick insight into what things like tannins are. Though, even without definitions, the stories soon compensate for any vocabulary that isn’t immediately obvious.
Unquenchable will reignite the desire for new experiences in anyone who has settled into a stable wine routine, and will give you lots of good reasons to try things you never thought you would. MacLean makes pairing easy and exciting (thanks to a beautifully written chapter about Argentina, CK and I are currently recovering from an Argentinean-Malbec-and-cheddar-cheese-bliss-coma that everyone should try at least once), and leaves the reader room to make the experience of wine choosing and drinking as thoughtful (or as purely sensual) as they want it to be. 
Unquenchable makes a great holiday gift for any wine lover this year, and is an excellent addition for anyone who loves to travel. Be prepared: it’s not only your yen for wine culture and experience that will become unquenchable, but also your desire to see the places MacLean gifts to her readers in such living detail. Natalie MacLean’s thirst for life and living is part of the true pleasure of this read, and it’s a pleasure we hope she’ll keep on sharing.
Unquenchable is ripe for the picking at your local book retailer or online at http://www.nataliemaclean.com/, where you can find lots of other great resources.

Spinach Pear and Parmesan Salad with Balsamic Mustard Dressing

0 comments
This salad is really easy, and could be made really beautiful with a little careful pear-placement. I tend to go right in for chaotic salads, but you could make something quite pretty out of this one.


For the dressing, whisk together

3 parts olive oil
1 part balsamic vinegar
.5 tablespoon whole grain mustard
1 tsp brown sugar
a dash of salt

(These are my preferred ratios, and probably makes enough for two servings, however give it a shot and adjust to meet your own needs and tastes)

Drizzle this over
2 bartlett pears, sliced very thin, length-wise (one per person)
1.5-2.5 cups baby spinach per person

Once dressed, toss in half a cup of freshly grated parmesan (though not pictured here, shaved parmesan "petals" make for a sharper, more assertive parmesan presence that is super delicious. Saputo Parmesan Petals are my flowery cheese source of choice!).

Serve immediately

One-ingredient Hazelnut Butter (just guess what it is)

0 comments
Go read your peanut butter jar. Consider that all nuts naturally contain oils and therefore fats, and now think about where sugar factors into your jar's list of ingredients. We all desperately want peanut butter to be good for us, but the reality is that it just isn't a great option if you're going to be eating a lot of it (but everything is delicious in moderation..right?). Possibly your jar of natural nut butter contains only crushed nuts, and if so, good on you because that is an important move to make if you're going to avoid trans fats and things you can't pronounce. BUT, it's also probably you paid anywhere from 8 to 12 dollar for that butter, and we all know that the natural ones come in teeny jars (sad).

My proposition is this: buy nuts, blend, eat butter. The only necessary ingredient in any nut butter is the nut itself, because nuts are a generous gift from mother nature that we have mercilessly corrupted and mindlessly slathered on unsuspecting bread. Hazelnuts are an excellent butter nut because they are so naturally sweet, not to mention high in important vitamin Bs, however if you want to make your nut decisions based on things other that that (though other nuts are sweet too, macadamia and almond being big frontrunners in that category), or use the spread for savory sandwiches (not to say that hazelnut isn't a good option here either), check out this chart. Cashews are next on my list.

Delicious, but not photogenic
But today, I made my own hazelnut butter. Here's what you do: The short version is
1. roast nuts
2. grind nuts
3. eat nuts.

Here is my annotated version:


  • Preheat your over to 275. Nuts burn easily, so keep it low if you know your oven runs hot.
  • Lay your hazelnuts out on a baking sheet. You'll basically get half as much butter as you have nuts, so gauge accordingly. Natural butters have no preservatives and a short shelf life, so it's better to make a little at time, or freeze your excess if you make more than a cup of butter.
  • Roast your nuts for 15-25 minutes. I know this seems like a wide range, but you need to asses your own batch based on how they're doing (the range is determined from different numbers I've seen across the internet...I roasted mine for about 17 minutes). You'll know they're done when they are fragrant and the skins are cracking. A burned nut is a terrible (and disgusting) thing, so be careful.
  • Let cool for a few minutes, then, by rubbing handfuls of nuts between your hands in a dishtowel, remove the skins. (This is messy, but the skins get very bitter during roasting, particularly with other nuts. I kept a few skin-ny ones because I like the extra texture and it really didn't have a negative impact on the flavor at all)
  • Grind roasted nuts in a food processor or blender (I used my 4-cup Cuisinart and it was great...I've read that if you're using a blender you should toss in a tsp of oil, but I'm not sure why this is...water might work just as well...I had no problems though.)
  • Note: the less you try to process at one time, the easier the oils will come out to make a spread, so I ground it all once, to a crumbly spread, then ground it in half cups again, adding more when the first bit became oily, which happened fast.
Refrigerate. Well, eventually. I highly recommend you eat a bit right away, because your appliance will have warmed it up and...damn. It's so good. Please try to remember you are actually eating nuts. Your waistline and your digestive system will thank you for your mindfulness.

Cocoa is a great source of protein and zinc, but is high in saturated fats (but don't believe everything you hear...the verdict is still out on saturated fats, because so much depends on its composition)
For a chocolate-y variation, add to 1 cup of hazelnuts before blending:
1/4 cup cocoa
1 tbsp vanilla extract

5 tbsp of sweetener (the recipe I'm using asks for agave nectar, so use less if you're using sugar, and just adjust according to taste...my advice is to do this AFTER you've blended the cocoa and extract, and add in small quantities, as hazelnuts are delicious and their unique flavor really doesn't need to be steamrolled with sweetness)
Taste, and if you're not satisfied, add a pinch of salt.

This would probably be divine in almond butter too.

And voila! You are now a master butter maker! Eat it with confidence!

love,
A


Cottage Component 2!: Summer-Lovin' Sweet and Sour Skewers

0 comments
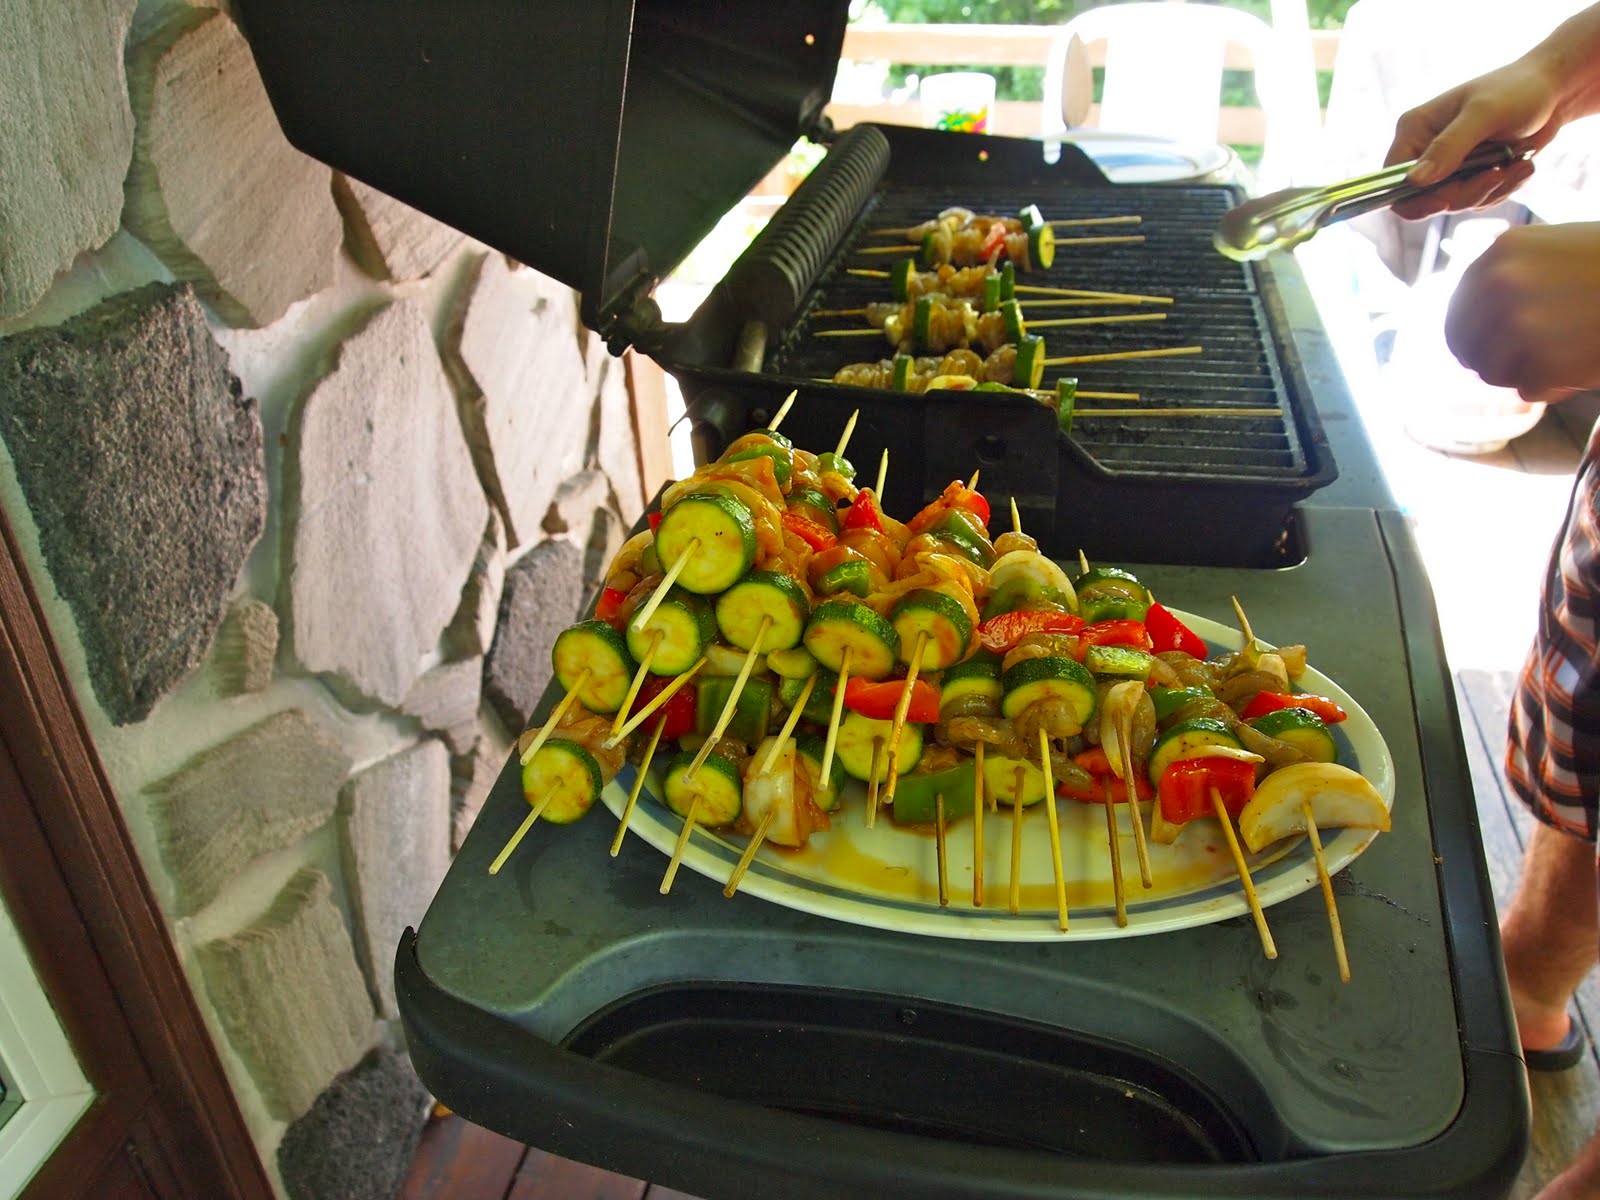
Before we left for our cottage adventure, CK came up with a great plan for feeding us right: we adjusted a recipe she found in a magazine to suit our group's budget and tastes, and came up with this winner! The quantities on this one are rough, because it really depends who you're trying to feed - our menfolk ate easily three times are many skewers apiece as we did. That being said, we served 6 people for about 6$ a head (including the pasta salad). We made around 40 skewers with this quantity of marinade, but that included a bunch that were just shrimp, without veggies. These, as it turns out, are a big hit, so when you run out of veggies and chicken, begin skewering just shrimp, and you will be everyone's favorite.

Marinade: (Note: Because I don't eat chicken, we split up our shrimp and chicken into different batches, dividing this amount of marinate between two bowls, and divvying up the veggies accordingly as well)
Props to Remy: Our host and a master griller!


In a large bowl (you'll be putting your chicken shrimp and veggies in here too) mix together...


3 tbsp ketchup
3 tbsp soy sauce (try to get reduced sodium)
3 tbsp sugar
1.5 tbsp apple cider vinegar
 Skewer ingredients: 
  • 3 small zucchinis, chopped into rounds
  • 1 green pepper, deseeded and chopped into chunks
  • 1  red pepper, likewise
  • 1 sweet onion (we used the leftovers from the pasta salad), cut into chunky wedges
  • An orange pepper would be a nice addition too, chopped into chunks
  • 1 bag frozen deveined shrimp (ours was a bag of 60-70 shrimp) - if you can buy them uncooked with tails off, power to you. Or, you can spend a good 15 minutes taking the tails off these babies if you REALLY love your guests).
  • 4 chiclen breasts, cut into chunks


Mix skewer ingredients into marinade (whether you keep' em separated or not), and let sit for about 15 minutes. If you like your skewers really juicy, set aside a few spoonfuls to brush onto the cooked skewers. Skewer ingredients onto sticks, alternating meat with vegetables for as long as possible. Grill on the BBQ for about 4 minutes each side. Serve immediately. Pairs nicely with the Picnic-Perfect Pasta Salad!
Grill on!
-A